Before I go too much further with my Red Sea images, I wanted to tell you a little bit about my new gear. I’m not usually a gear head but quiet a few people have been interested so I thought while it was all fresh in my mind I’d get it down here. The flow of new holiday images will resume tomorrow!
At the beginning of the year I was lucky enough to have two week use of an Olympus OMD in Raja Ampat (thanks to Alex Mustard who had his spare when my luggage didn’t make the flight). It worked well for my own needs so when I got home I started selling my nikon gear (theres still some lenses and a housing left if you’re interested) to buy into this new little system. This most recent Red Sea trip was the first trip with my very own Olympus OMD. Here I’ll list what I liked and disliked and some tips & links I found useful.
So pros & cons… urmmm.
Pros:
– Tiny & Lightweight. This is greatest point for me not only for travelling but also in the water. I can hold the rig with one hand without my arm falling off! I have RSI in my wrists so I always found the subal housing a bit much. Also, for photographing around London I can look more like a tourist (you get away with less hassle from officials with a small snappy looking camera) and it fits in my handbag. It also fits on a very small gorilla pod which also fits in my handbag 🙂
In the picture below you can see the size comparison between my wee little camera and the D300 subal like I used to use.

– Great High ISO performance. I got up to ISO 2500 in the caves in Jackfish Alley. Here is one at ISO 1000. My D300 didnt really like to go much above 800 before the noise started to creep in. Its useful for filter shots too as they lose you one stop of light and its good to bump the ISO to maintain a decent shutter speed.

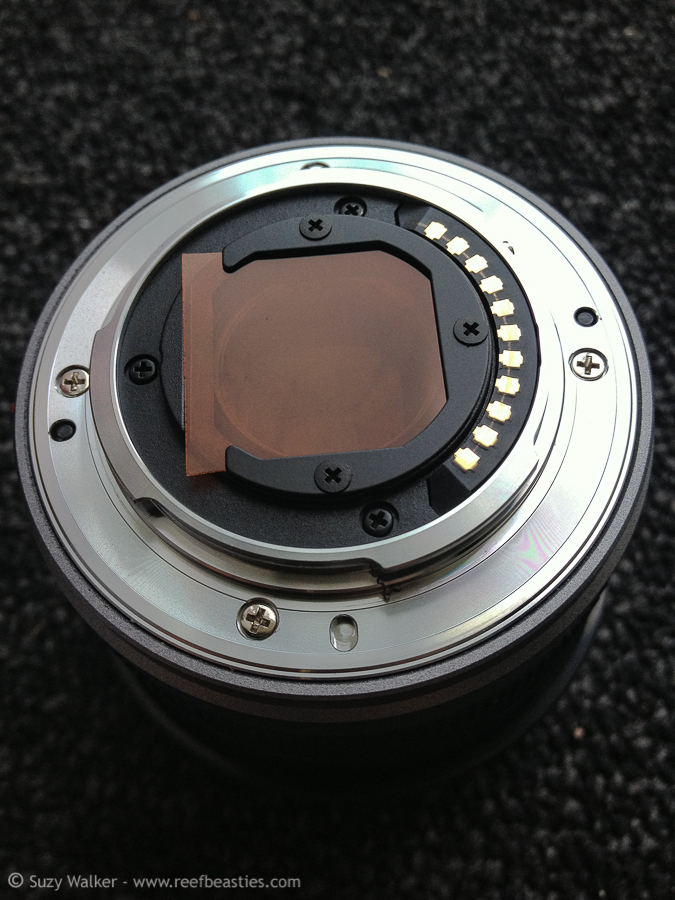
– Magic filters are so much easier now, I used to have to tape it to the back of the lens but the little Panasonic FE has a little filter slot…
This photo of Yolanda Reef was taken with Magic Filter (as were many of up yet to be blogged about Schooling Snapper photos so stay tuned over the next few days). I also found the custom white balancing less of a pain in the rear.

– Video! My old camera had no video capability. I’m a pretty bad camerawoman for video but I’m sure I’ll get better with practice. Its really nice to have the option to switch to video. This is especially effective with a magic filter on (because I dont have any movie lights) or in very shallow water.
Here is 4 seconds straight from the camera. No filter, just really shallow. You can see it in HD on vimeo here.
I took a lot of little video clips with my Oly and my GoPro so after I’ve finished going through my photos I’ll see what I’ve got to show you 🙂
– x2 crop factor. While everyone else is going full frame crazy with D800 etc I was loving the DX crop (x1.5) factor on my D300 for macro work and holding out for a D400. Now I have x2 crop factor – even better for macro! This also means I only need one macro lens. The 60mm on my Oly is really 120mm which is somewhere between 105mm (155mm) and 60mm (90mm) for my two macro lenses for the Nikon D300. In Raja Ampat I was easily able to take Pygmy seahorses & Skeleton Shrimp with the 60mm.

– Screw thread on the macro port. Another macro plus point, I’m able to screw a subsee lens straight onto the housing without the need for an adaptor. I know what I want for Christmas! 😉
– Tiny 3.5″ dome. This is a pro & a con depending on how you look at it (see below for the con). For close focus wide angle I’m able to get my tiny camera lower & closer to things to get a different view point than before. Here is a crocodile fish I found under the boat…

– Configurable buttons & dials. This is great. You can really customise exactly what you want for each button to do if you have the patcence to go through all the menus initially. Alexs settings guide is a great place to start. I didn’t use all the same settings because I wanted to keep the video for video but many of the same. One thing to bear in mind if you are going to reduce your flashes down to 1/64th though, make sure to have your Inons set to flash only once (with no pre flash). I Spent a whole dive wondering why my flash guns (set on manual) were very dim and its because I was only getting the pre-flash power – doh! (You have to push a lock the little button on the back of the strobe to be normal position.
– Optical triggered Strobes. I cannot tell you how cool I found this. You can actually take your strobes off camera underwater and slave trigger them with no other gear required. In fact when I wanted to experiment with off camera strobe I fixed the slave unit to a sync cord on one strobe(just so I could hide the strobe) and fastened it to the optic until I needed it off camera then just detach it, set it on the tripod and volia!
These sweepers I blogged yesterday were taken with an off camera strobe to light up the caves behind them:

I also experimented with off camera strobe in the wreck – those images coming up in tomorrows post.
– Really nice iAuto mode. I’m pretty lazy for topside photos. I find the auto mode be produce great photos right out of the camera.
– Takes SD memory cards. This is another pro & con. Pro because SD cards are more flexible, you can use eyefi cards etc, also a pro because I don’t need to carry an extra card reader because SD fits straight into my macbook air 🙂 And my GoPro 2 takes SD cards. It’s a con because I had to buy all new extra memory cards because most SLRs take CF so just another added extra expense of change over with no need for CF cards anymore.
Cons:
– Only small domes. With my Subal housing I had a mini dome and a larger dome. The larger dome is useful for split shots in rougher weather. I did try a dive with the 4″ dome which has better corner sharpness than mine and was able to get this one…

In completely dead flat water in the mangroves of Raja Ampat I was able to get this one with my 3.5″ mini dome but the sea is rarely completely glass still like that:

– No lens reuse with my old system. I’m having to sell all my nikon stuff which is a pain. If you know anyone who is after some great condition Nikon lenses please give them this link: https://suzywalker.wordpress.com/2013/02/24/nikon-subal-gear-for-sale/
– Slightly slower auto focus in some cases. This is a pro & a con actually. I mentioned above that now I only use one macro lens. I think this focuses faster than my 105mm Nikon (which hunts like crazy underwater) but no where near as far as my 60mm Nikon which was alway my favourite lens.
– Not in the Adobe LR list of lens corrections. This is just weird. Both Olympus & Panasonic are missing from the lightroom list of cameras & lenses you can auto correct the distortion etc on for such instances where you’d like to de-fish your fisheye lens.
I think that’s it for the pros & cons. If I think of anymore I’ll edit the post or add them as a comment below. There are some things which are neither pro or con just different and needing a mental adjustment for. I am enjoying now shooting for a 4:3 frame and hardly ever shoot to crop for 3:2 aspect ratio. And changing from amazing viewfinder on the Subal housing to using the screen on the Nauticam (it has a view finder buts its pretty unusable on the housing) has been a bit of a stiff adjustment for macro subjects. I often find myself pointing the camera in the completely wrong place for the critter and having to mentally map the contours of the coral to find the critter on to the screen.
Here is my Equipment List for reference:
- Olympus OMD EM5 with kit lens. Important not to buy body only because you need the little flash unit that comes with the kit.
- Olympus M.ZUIKO DIGITAL ED 60mm 1:2.8 Macro lens
- Panasonic Lumix G Fisheye 8mm lens
- Nauticam Housing for OMD
- 3.5″ semi-dome port (for the FE lens)
- Macro port 45
- Gear ring to make the 12-50 kit lens fit inside the macro port. They do a port specially for it but its very expensive and yet another thing to carry.
- Nauticam knob that fits in Coldshoe to attach my strobe arms too. You can get trays & handles but I wanted it without.
- I already had the strobes (two Inon z240’s and ultralight arms)
And here is the list of useful resources for taking the Olypmus OMD underwater:
If you have any comments or questions please feel free to leave a comment below. And if you have an OMD and love it too then also comment to say why if I haven’t listed your reason! Stay tuned for more red sea pictures. Tomorrow, the Thistlegorm wreck, one of the most visually interesting wrecks I’ve ever visited.